

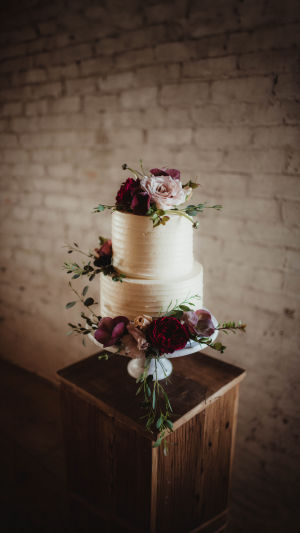
Have you ever stood in front of a wedding cake and thought — I could never make that? Two tiers high, wrapped in ivory buttercream, crowned with deep crimson garden roses and dusty rose blooms spilling down each layer.
Every eye in the room locked on it before a single slice was cut. Here's the truth nobody tells you: this cake is far more achievable than it looks. If you've got a weekend, a stand mixer, and a little patience, keep reading — because you're about to surprise yourself.
<h3>What You Will Need (Serves 10)</h3>
For the Vanilla Sponge (both tiers):
1. 240g (1⅔ cups) all-purpose flour
2. 200g (1 cup) caster sugar
3. 120g (½ cup) unsalted butter, softened to room temperature
4. 2 large eggs
5. 140ml (⅔ cup) full-fat milk
6. 1 tablespoon pure vanilla extract
7. 1 teaspoon baking powder
8. ½ teaspoon fine sea salt
For the Vanilla Buttercream:
1. 240g (1⅔ cups) powdered sugar, sifted
2. 120g (½ cup) unsalted butter, softened
3. 2 tablespoons heavy cream
4. 1 teaspoon pure vanilla extract
5. Pinch of sea salt
For Assembly and Decoration:
1. 2 round cake boards — 4 inch and 6 inch
2. 3–4 wooden or plastic dowels for tier support
3. Fresh flowers — deep red garden roses, dusty rose blooms, eucalyptus sprigs (food-safe or wrapped stems)
4. Offset spatula and bench scraper for smooth finishing
<h3>Step-by-Step Instructions</h3>
Step 1 — Bake Each Tier Separately
Preheat your oven to 325°F (160°C). Cream butter and sugar together until pale and fluffy — at least 5 minutes on medium-high speed. Add eggs one at a time, beating well after each. Alternate adding the flour mixture and milk in three additions, beginning and ending with flour. Stir in vanilla. Pour into greased and lined pans: a 6-inch pan for the base tier and a 4-inch for the top. Bake times vary — approximately 28–32 minutes for the base and 20–24 minutes for the top. Test with a skewer; it should come out clean.
Step 2 — Cool Completely Before Touching
This step has broken many ambitious bakers. Do not rush it. Leave each tier on a wire rack for a minimum of 2 hours, then wrap in plastic wrap and refrigerate overnight. A cold, firm cake is infinitely easier to fill, stack, and frost than a warm, crumbly one. Every shortcut here costs you later.
Step 3 — Make the Buttercream
Beat the softened butter on high speed for 3–4 minutes until it turns noticeably pale. Add sifted powdered sugar in three additions, mixing on low between each. Add vanilla, salt, and heavy cream. Beat on high for 2 more minutes. The result should be smooth, white, and spreadable — not stiff, not runny. If it's too thick, add cream one teaspoon at a time.
Step 4 — Fill and Crumb Coat Each Tier
Level each cake layer with a serrated tool. Stack with a thin layer of buttercream between each level. Apply a thin crumb coat — a rough first layer of frosting that traps any loose crumbs. Refrigerate each tier for 30 minutes until firm. Then apply the final smooth coat using an offset spatula and bench scraper, pulling along the sides in one clean motion. The ribbed texture is achieved by pressing the back of a spoon horizontally in light, overlapping sweeps around the sides.
Step 5 — Stack the Tiers with Dowels
Insert 3–4 dowels into the base tier in a square pattern, trimmed flush with the top of the cake. Place the top tier on its cake board directly on top, centered carefully. Without dowels, the upper tier will slowly compress into the lower one — especially in warm conditions. Don't skip this step, no matter how sturdy the cake feels.
Step 6 — Add the Flowers
Wrap all fresh flower stems with floral tape before inserting into the cake to prevent stem contact with the sponge. Arrange a generous cluster of deep red garden roses and blush roses at the base of the top tier, and a second cluster cascading down the front of the bottom tier. Tuck in eucalyptus sprigs for a wild, romantic trailing effect. Step back. Adjust. Done.
<h3>Key Tips and Notes</h3>
1. Bake tiers on separate days. Spreading the work over 2 days makes the project manageable without sacrificing quality.
2. Room temperature ingredients matter. Cold butter or eggs will cause the batter to split. Set everything out at least an hour before baking.
3. Never skip the dowels. Even a small top tier will compress a soft cake beneath it over time, especially in warm environments.
4. Fresh flowers need preparation. Always wrap stems — some flowers are toxic if in direct contact with food. When in doubt, use food-safe floral picks.
5. Assemble on-site if possible. Transporting a fully assembled two-tier cake is risky. Carry the tiers separately and stack at the venue.
<h3>Flavour Variations Worth Trying</h3>
The two tiers don't have to match — and that's half the fun. Try a lemon sponge with raspberry jam at the base and a classic vanilla on top, or go bold with a rose-infused sponge on the bottom paired with coconut cream on top. For the frosting, Swiss meringue buttercream delivers a silkier, less sweet finish than the classic version — worth the extra effort for a special occasion.
So — are you going to try it? Whether this is for a wedding, an anniversary, or simply because you wanted to prove something to yourself, making a cake like this by hand is one of those experiences that quietly changes how you see what you're capable of. Drop a comment below and tell us how yours turned out. Did you stick to the classic vanilla, or did you put your own spin on it? We genuinely want to know.


